
As opposed to common and traditional sundials that are affected by different photoperiods throughout a year, this model takes into account the geolocation of the sundial to neutralize inaccuracies due to different day lengths.
Once the sundial has been built, two requirements need to be met to avoid mistakes: precise north-south alignment and horizontal leveling.
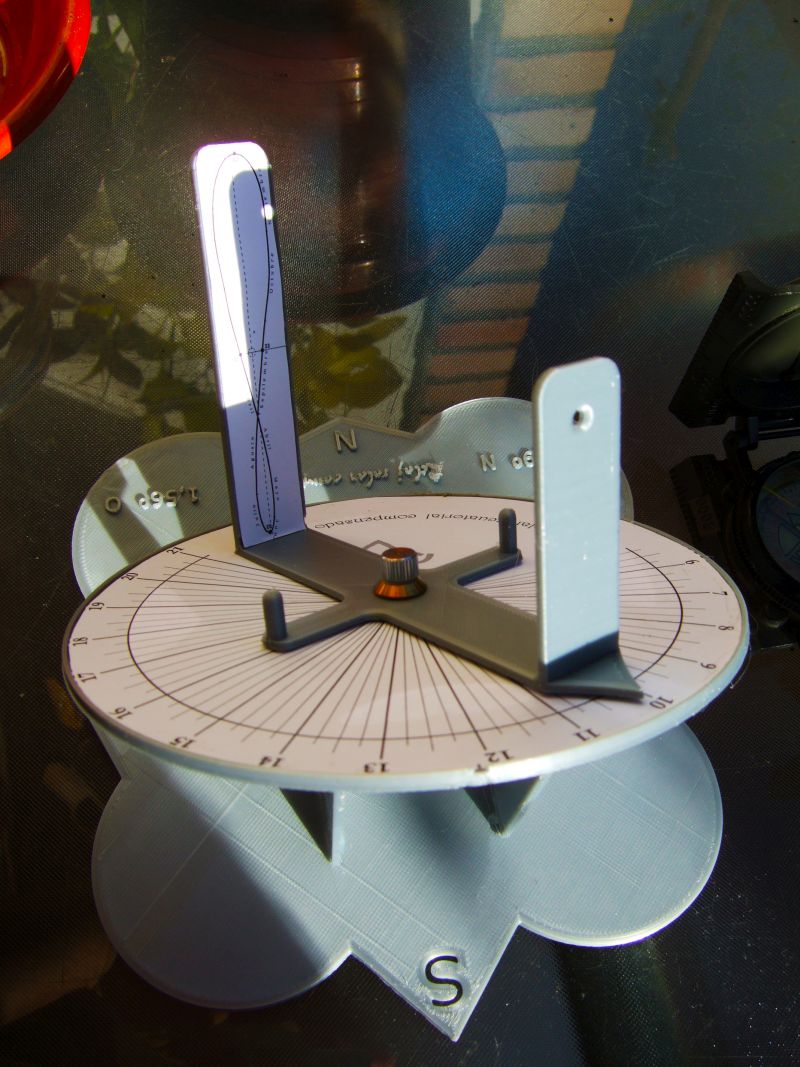
The sundial is meant to be interacted with in a simple manner, making it more attractive and accurate. The interaction consists of spinning the arm connecting the gnomon to the analemma so that sunlight goes through the hole located at the top of the gnomon and shines on the date available at the analemma that is closest to the actual date at a given moment. This way, the tip of the arm will give the solar time, and users will have to add one hour to it in wintertime, and two hours to it in summertime in order to calculate civil time.
Step by step
Out of all the different files labeled Soporte lateral izquierdo and Soporte lateral derecho, choose the .stl file closest to the latitude of the location where the clock is to be placed. Example for San Sebastian: left-side stand 43º and right-side stand 43º. This determines the inclination of the time disc.
Afterwards, print the remaining .stl files (clock base, analemma, gnomon disk and arm), located in the common files folder.
Finally, print the .pdf file on A4 paper, also located in the common files folder. Once printed on paper or cardboard, cut it out along the dotted lines. Before sticking it on the disk, the longitude of the given location must be considered, since there is a time difference between the official time and solar time of 4 minutes per degree (positive or negative), with respect to the Greenwich meridian (zero reference meridian). Example for San Sebastian: There is two degrees to the west of the Greenwich meridian; therefore, the clock on the time disk must be moved 8 minutes to the left of the notch on the 3D-printed disk to avoid the shown time being ahead.
Example for Balearic Islands: set clock at -4º. Example for Galicia: set the clock at 8º.
The analemma, once cut out, will be fixed by fitting its center to the small hole (at mid-height) of the printed piece (see photo). An option for this is to pierce the paper with a pin.
The rest is assembled by fitting and gluing all printed pieces.
It is recommended to place a small plastic disk (around 1 and 2 cm) that reduces friction between the arm of the gnomon-analemma and the hour disk and thus facilitates spinning around the nut and screw that fixes all elements.
Once finished, we must orient it as indicated on the North-South line (the four cardinal points appear on the base of the clock for its correct direction) on a surface that is as horizontal as possible.
In case a compass is not available, orient the dial as follows:
- Turn the tip of the arm that marks the hours until it is set to the solar time at that moment (look at the time on a clock and subtract one or two hours as necessary).
- Then turn the whole clock until the light that enters through the hole in the gnomon is projected onto the corresponding date on the analemma; this will align the clock correctly North-South.
For laser cutting on MD or other 5mm thick material, use the corresponding files and print the .pdf on DIN A3 paper, as the size is double.