
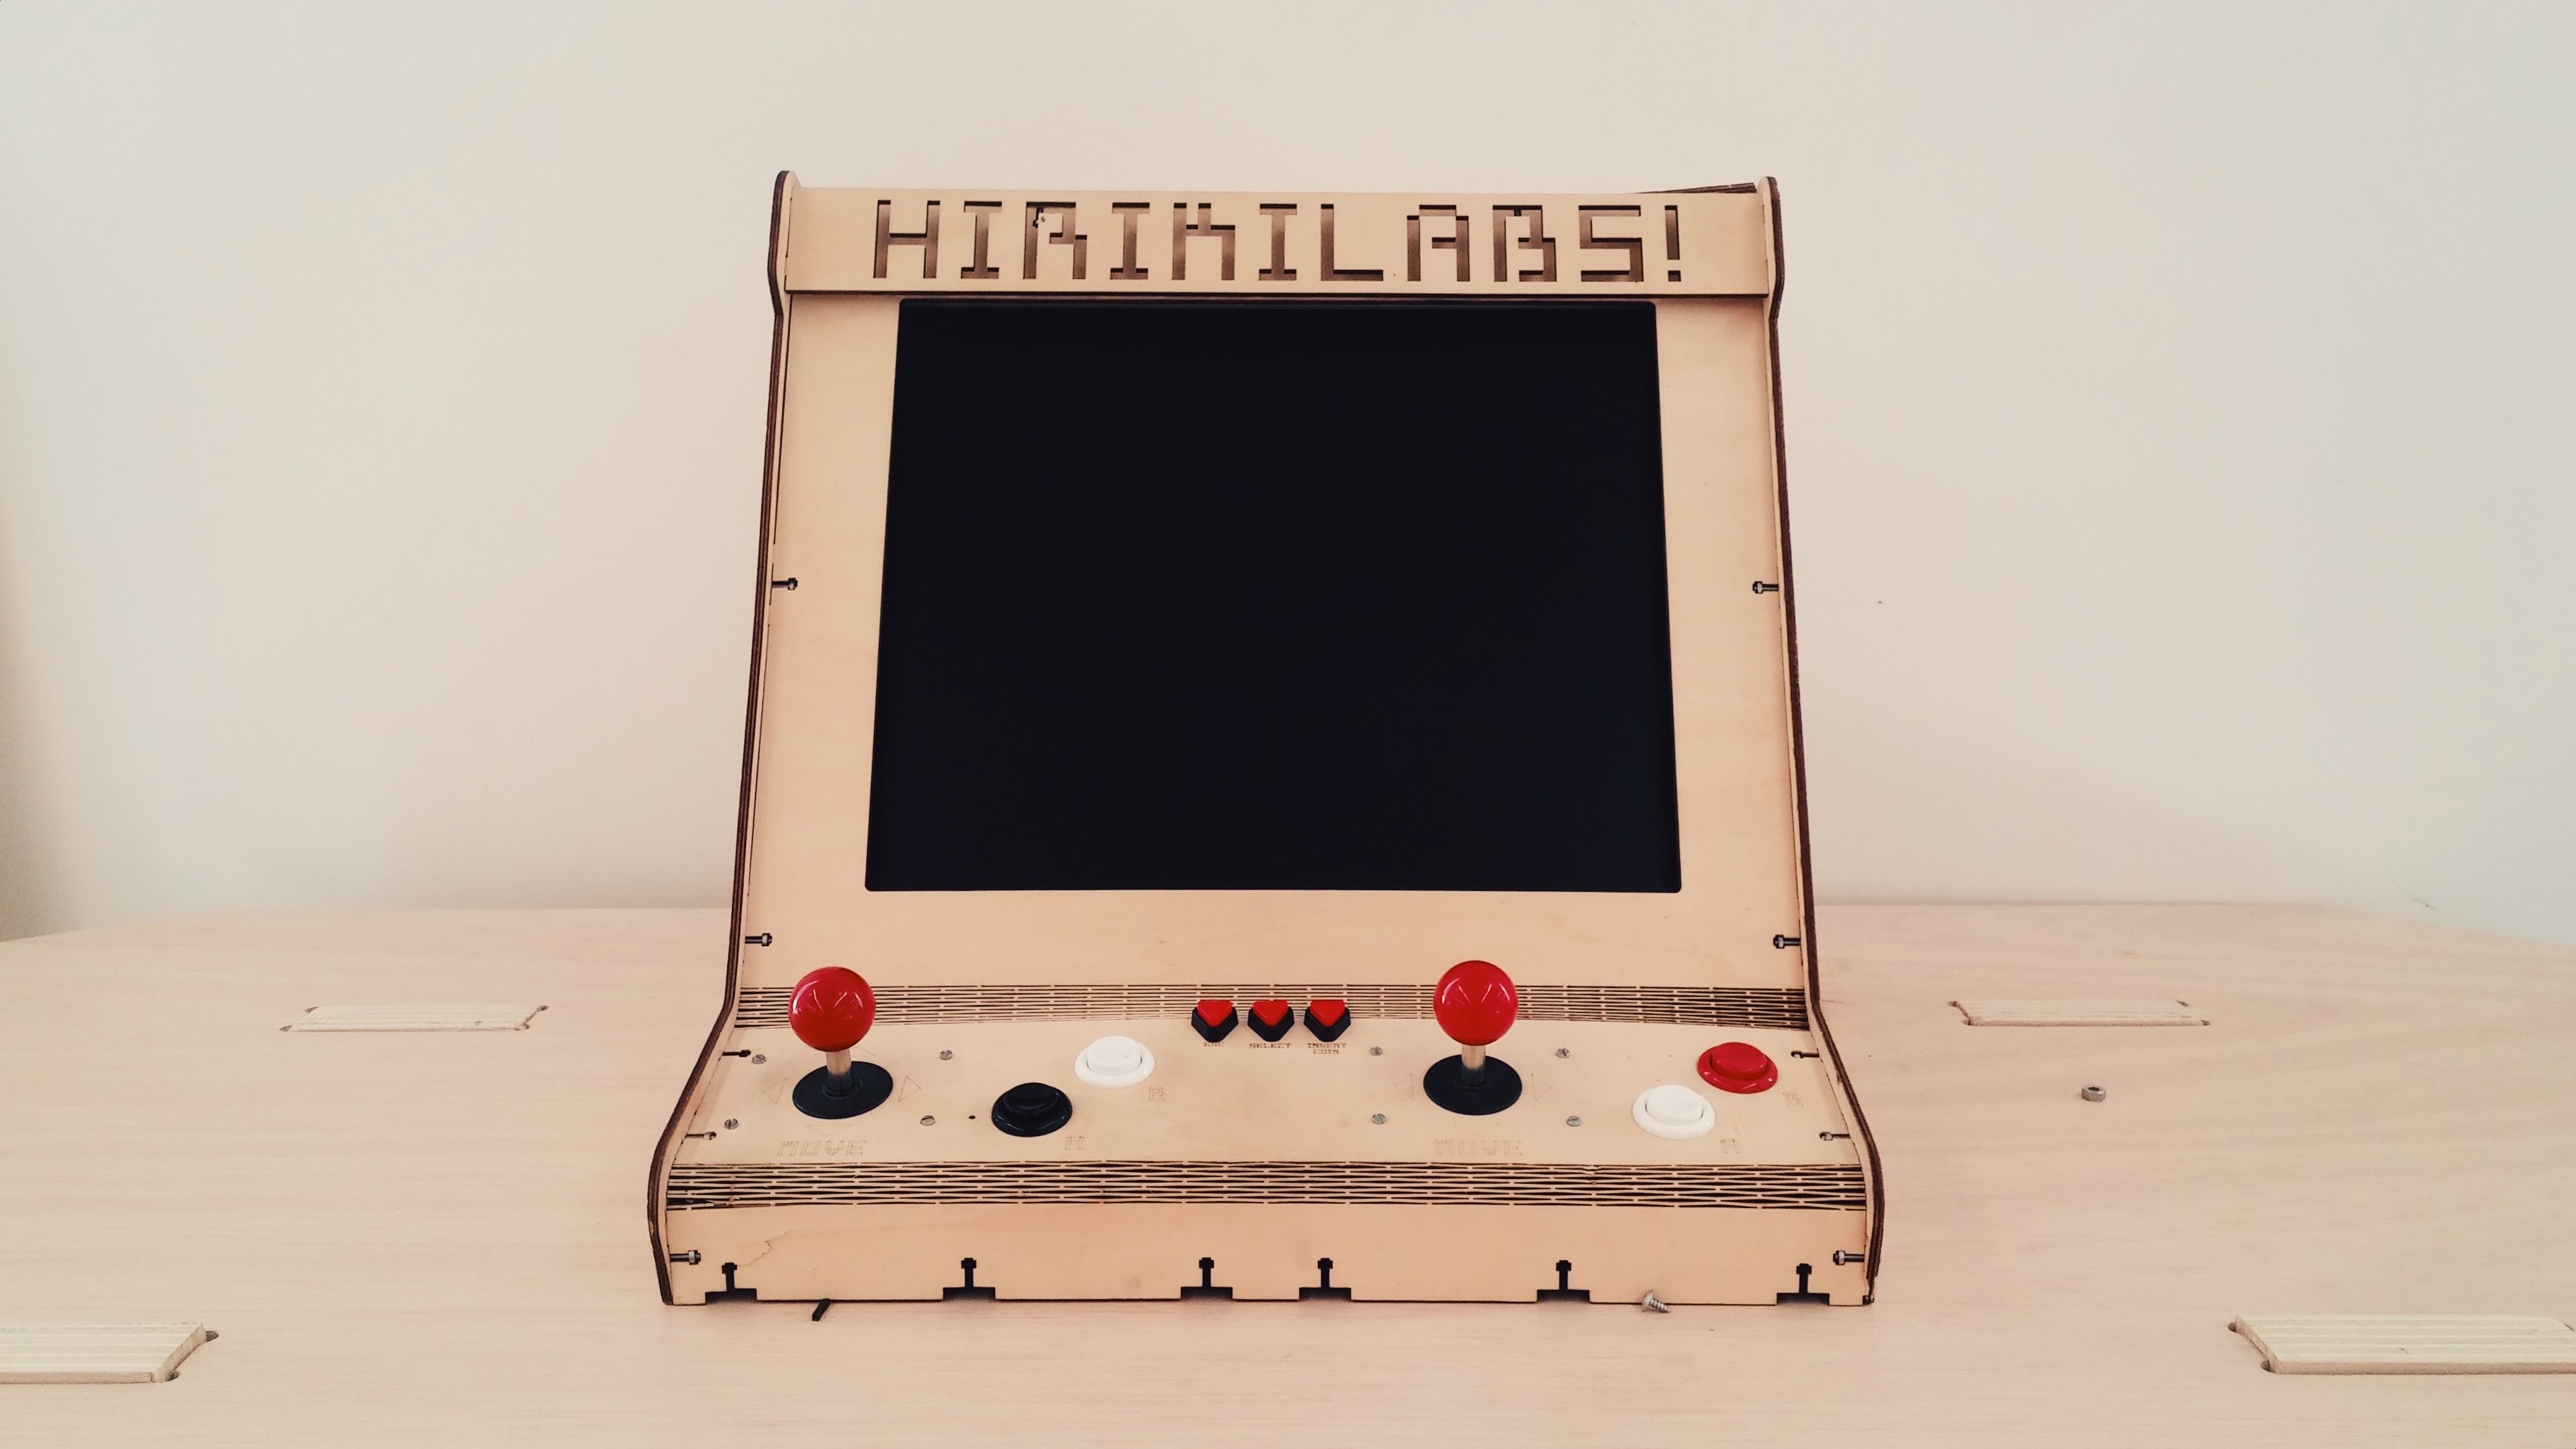
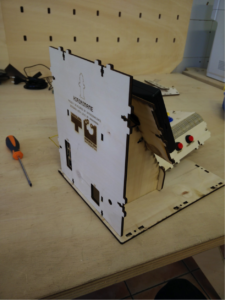
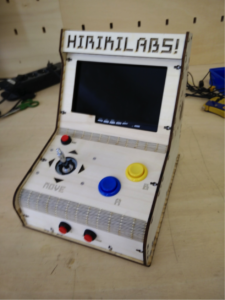
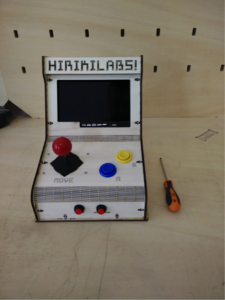
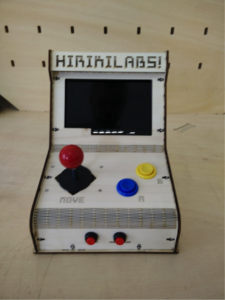
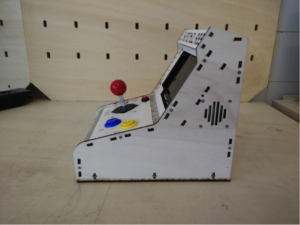
Thanks to the affordability of the Raspberry Pi2 and by using digital manufacturing technologies, you can build your own mini arcade game machine for a unique retro clickable experience.
Based on the first designs made by Arquimaña and Interzonas in different workshops held at Hiriklabs on 4 and 5 July 2013 (using the Raspberry Pi 1 model B) we have prepared this little step-by-step guide to assemble this mini arcade gem.
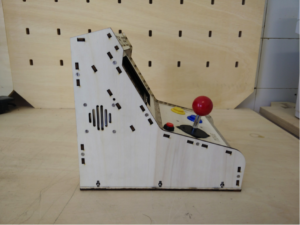
Here you can get your own plans to make the housing thanks to the design work by Arquimaña. To implement the design you will need a laser cutting machine or service, which you can find at any makerspace, fab lab or fab store in your city.


Step by step
You will need the following material to build and configure your arcade machine:
- Dual 12 V + 5 V power supply (2 A minimum)
- Mini USB cable (left angle or cable and adapter)
- 1 x AV 3.5 mm to 3 RCA composite video cable
- Female/female colour jumpers
- Raspberry Pi 2 B+
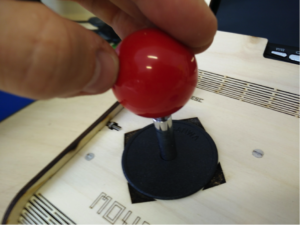
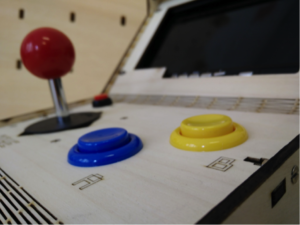
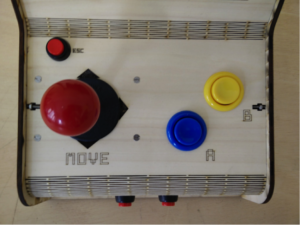
- Sanwa JLW-TM-8 joystick (Japanese J-stick)
- 2 x classic Suzo-Happ game buttons
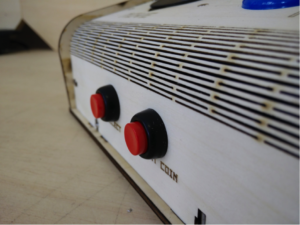
- 3 x 12 mm red manoeuvring buttons
- 7″ TFT car screen with VGA 800×480 input (this could also be used)
- Any 12 mm red Momentary Normally Open push-buttons x3
- 7″ TFT car display screen 800×480 (Maybe this one will fit)
- Class 10 MicroSD card and reader (16 GB minimum, 32 GB recommended)
- 1.6 mm and 9.5 mm heat shrink tubing
- M3 25 mm countersunk screw
- M3 square nut . M3 10 mm washers
- M5 5 mm screws . M5 square nut x 1
- M5 15 mm washers . 40 mm self-adhesive Velcro tape
- Laser-cut housing parts. 2 plywood sheets of 4x600x400 mm as a minimum (THICKNESS)
- 0.5 mm coloured wires
- Electrical tape
- Small Phillips screwdriver
- Set of Allen keys
- Pliers
- Electrician scissors
- Multimeter
- Wire stripper
- Soldering iron
- Solder
- Soldering iron support
- HDMI display and keyboard for set-up
- Ethernet cable, router and internet connection (can also be done via Wi-Fi)
Raspberry Pi runs at 5 V and our 7″ TFT screen will run at 12-24 V. In order to simplify the system and not use 2 different power supply systems, we will use a dual 5 V and 12 V power supply.
We cut the connector with the scissors and strip the inner wires. We will usually see 3 different wires: one yellow, one white and one black. By combining the different colours we can achieve the necessary voltage. In our case, this will be done through the following combinations, but you will have to make sure in your case using a multimeter and connecting the supply to the mains.
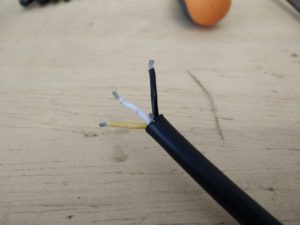
Black/earth (positive) so that > between yellow and black = 12 V
between black and white = 5 V
Now we will cut the USB cable, leaving 20 cm between the micro USB connector and the cutting point. Again, we strip the cable with the scissors and then we strip the inner wires with the stripper. We can see three wires: green, black and red. We can discard the green one (which is the data cable). To achieve 5 V we will prepare and insert heat shrink tubing in each of the wires and we will solder them to the power wires as mentioned above, i.e.:
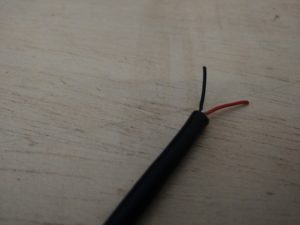
Red USB wire → white power wire
Black USB wire → black power wire
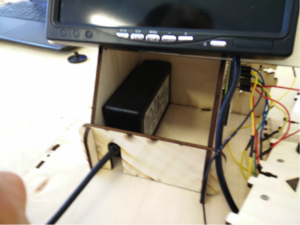
Finally, we will solder the 12 V to the TFT screen. This type of screen usually has 3 wires: red, black and blue. We cut the blue, which we will not need, and again we strip the other two wires, inserting them into the heat shrink tube and soldering each of them as follows:
Red TFT wire → yellow power wire
Black TFT wire → black power wire
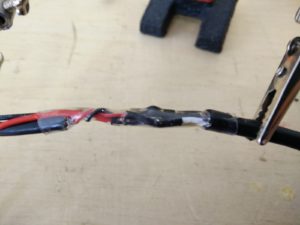
Now we can join all the heat shrink tubes with electrical tape to finish this part, but without unplugging the soldering iron because we will need it in the next step.
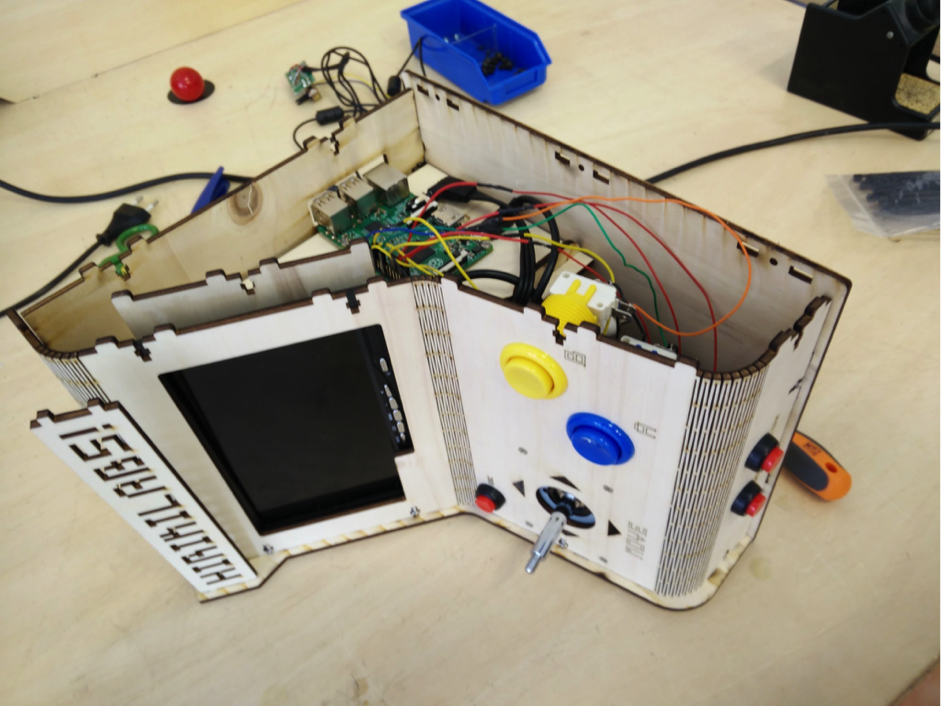
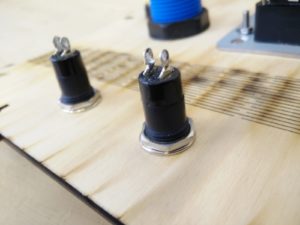
Now we will prepare the front part of the casing by mounting the joystick and buttons and doing the corresponding soldering.
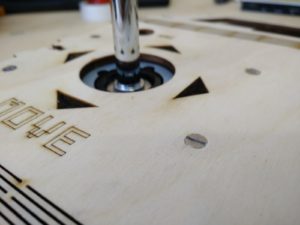
For the joystick we will use the M3 25 mm countersunk screws, nuts and washers. We screw them in until the countersunk head of the screw is sunk into the wood and the surface appears completely flat.
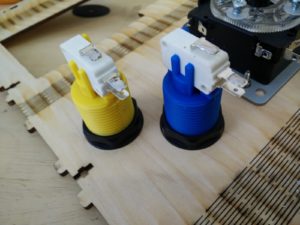
Then we insert the push-buttons (the big ones) and the menu buttons (the little red ones) using their own big nuts.
Once everything is in place, we will prepare the connection wires. We take the female-female jumpers, cut them in half and strip them. Next, we cut 25 cm of coloured cables, insert sheets of heat shrink tubing and solder them together. We will need 11 cables for 1 player:
- 2 black
- 4 yellow
- 3 red
- 1 green
- 1 blue

Now we solder each one to the NO (normally open) pins as we see in the following diagram. We will also make the common connections from GND to all buttons and to the joystick. It’s simple if we follow the diagram!

This is the most exciting part, where we are going to prepare our Raspberry Pi to turn it into an amusement arcade game.
The Raspberry Pi is a low-cost computer the size of a credit card that connects to a computer monitor or television and uses a standard keyboard and mouse. It is a device with great possibilities that allows people of all ages to explore computing and learn to program in languages such as Scratch and Python. It is capable of doing everything we expect from a desktop computer, from browsing the Internet and playing high-definition video to working with spreadsheets, word processors and playing games.
In this case raspi is the perfect choice for the project thanks to its small size, low power consumption and compatibility with arcade game emulators.
We have 2 ways to install the system: the simplest that we have described here (install and play) and the advanced mode where we will follow the process step by step to make the machine work (and learn how everything works).
- Simple mode
We download our latest disk image, hirikimame_vXX.XX.img and follow these steps to copy/burn it to our microSD card. Once this is done we can move on to the next step.
- Advanced mode
We download the image from piplay and burn/record it on our microSD following these steps:
We insert the microUSB in the raspi.
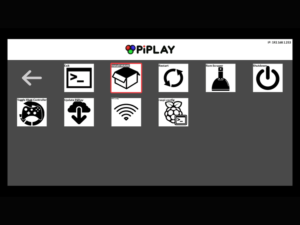
We connect the keyboard, the Ethernet cable and the HDMI screen to our raspberry pi and we plug it into the power supply. We wait for the piplay home screen. Once there we navigate to the Raspberry Pi configurator in the option called Raspi Config or press ESC and type in the terminal (making sure that the keyboard language configuration is correct).
# sudo raspi-config
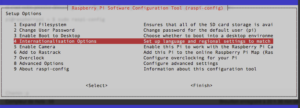
In this configuration menu we will have to take a number of steps. (To move through the menus we use the arrow keys on the keyboard. To select an option we press enter. To exit we press ESC and to jump to the Finish button we press TAB.)
1 Expand Filesystem = it is necessary to do this. Piplay is using about 2GB of our SD card at the moment, so in order to use the remaining free space to install games and settings we will expand the file system. (The operation will be completed on the next reboot).
2 Change user and password = if we are going to leave or use our machine in a place open to the public, it is advisable to use this option. If you are not going to be in a public place, knowing how easy it is to forget these types of passwords, do not change it.
4 Internationalisation options -> change timezone = we will choose our time zone to avoid problems with internet downloads.
4 Internationalisation options -> change keyboard layout = we will select our own keyboard layer. Generally, the “generic 104-key pc” works.
7 Overclock = we will select the Pi2 option, generally sufficient for any type of arcade game. If we plan to play PlayStation games we can increase this level. It is VERY IMPORTANT to understand what this implies, so here are some of the risks that we have to take into account:
Reduction of useful life – components could fail sooner.
Heat generation – by operating at higher speeds we generate higher temperatures (heat sinks are recommended).
File corruption – file corruption has been observed in non-optimised overclocking settings.
Loss of warranty – forcing the voltage leads to loss of warranty.
Now we can shut down and restart our raspi.
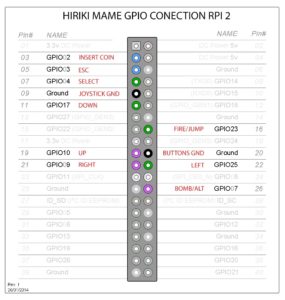
As we have said, Raspberry Pi is a computer the size of a credit card that we can connect to a monitor or TV, but it also has some special characteristics that make the board ideal for this project. This on-board computer has a GPIO (general purpose inputs and outputs). These small pins can be used for any purpose where it is necessary to communicate with external devices such as sensors, buttons, actuators. Raspberry Pi 2 has a 40-pin header with these outputs or pinouts:
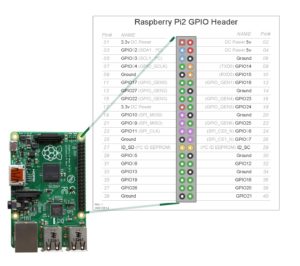
The arcade machine that we have just installed allows us to play with a standard keyboard, so we will connect these outputs (pinouts) to connect our buttons and joystick and simulate the keystrokes of a keyboard. To make this happen we have different and very good shell scripts such as Adafruit-retrogame, although the one we will use is the mholgatem gpioneer daemon, a simple-to-use and very intuitive program.
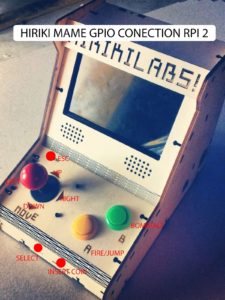
First we will connect all the parts to each other. We take the jumpers that we have soldered and connect them to the GPIO pins following the guide. (This is only for those who follow the “simple mode”. If you are going to install everything following the “advanced mode” you can connect them however you want; you will later see why.)
Take a closer look at the joystick switches and connect them according to which one is pressed when you move the joystick in a particular direction.
The earth wires can be connected to any ground pin on the Raspberry Pi 2. It is also possible to make a single common GND wire for all switches.
Now we connect the composite video cable (the red male RCA) to the AV input connector of the 7″ TFT screen (any of the 2 yellow female RCAs), the power to the screen and the raspi, and the Ethernet cable and disconnect the USB keyboard. We insert the microUSB that we have previously burned (with the image, not with fire xD) if we have not done so already. We plug in the power and turn on the screen. Raspi will boot up.
Only for advanced mode installations:
(Those of you who have used the “simple mode” can jump to the next step – we have already done it for you😉).
When the Piplay home screen appears, we connect the keyboard again and press ESC to navigate to the terminal. Once there, we press:
 # cd
 # git https://github.com/HIRIKILABS-repo/gpioneer/gpioneer.git
 # bash gpioneer/install.sh
The script will start and install the Python libraries to make the daemon work. We will have to wait a bit, depending on our internet connection. It can take up to 15 minutes. When it finishes, it will ask us to carry out the initial configuration. We press yes and start.
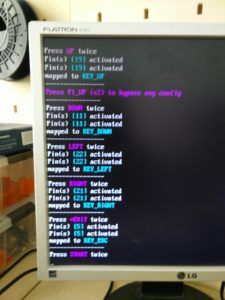
The script will guide us to map the GPIO pins as keystrokes, pressing UP twice, DOWN twice and so on. We have 5 buttons and 4 directions but this daemon would allow us to play with up to 9 buttons for each player, so we can press any buttons 6-7-8-9. Then we will delete them. We will say NO to the configuration of the second player and we will finish with the configurator. Now the set-up script will reboot the system for us. We will wait until it starts and try to move through the menu with the joystick. The daemon will work in the background forever =).
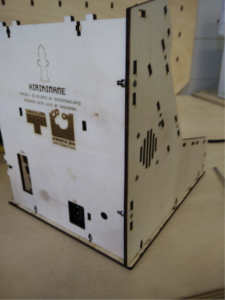
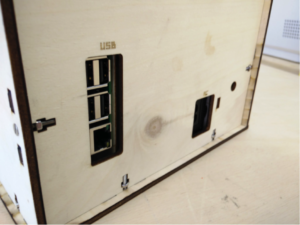
Now that the video game is working it’s time to close our wonderful housing made using core laser.


Piplay is a pre-packaged Raspberry Pi OS designed for gaming and emulation. It includes the following emulators:
- MAME – AdvanceMAME & MAME4ALL*
- CPS I / CPS II – Final Burn Alpha
- Neo Geo – GNGeo
- PlayStation – pcsx-reARMed Genesis – DGen
- SNES – SNES9x
- NES – AdvMESS
- Gameboy – Gearboy
- Gameboy Advance – GPSP
- ScummVM
- Atari 2600 – Stella
- Cavestory – NXEngine
- Commodore 64 – VICE
The MAME emulator needs about 10 GB of space, so we will install it now. If you have a 16 GB SD card, it may become full, so we recommend using a 32 GB or higher capacity SD card.
We navigate to the option “Install MAME” in the menu and wait until it is installed. We will need a fairly fast internet connection or we can have a coffee while we wait.
Adding ROMs
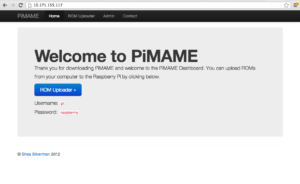
All system ROMs should be stored in the directory /home/pi/roms. PiMAME includes an FTP server and a web uploader that makes it easy to upload games. You can follow the steps in this piplay team quick start guide. (We will need another PC/Mac computer in the same local network).
To access the web front end, we will turn on our arcade machine connected to the Internet and enter the IP address that we will see on the arcade home page (top right) in our web browser.
Updating Piplay
PiMAME comes with an updater script included, so we can make sure we are running the latest version.
On the Main Menu screen we select Exit (Return to Command Line)
On the command line we type:
cd pimame_installer/ and press Enter.
Now we type: ./update.sh
When the script is complete it will be time to reboot. We type: sudo reboot and press Enter
Now we will have the latest version of PiMAME installed.
Configure keys/buttons in emulators.
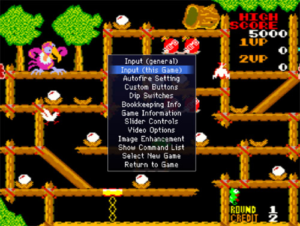
If we have loaded a ROM we will observe that some emulators do not work correctly with our controls. Each emulator has its own control maps, so we will have to carry out the mappings for each emulator. Sometimes even each game can have its own key configurations, so we will configure them one at a time. To do this, we have to connect our keyboard and press TAB when we are in a game or emulator and we will see the following menu. We select “input (general)” to map only the game we are playing. It will also be saved for when we play again in future.
Initial start-up with a specific game/emulator/rom
We type:
#sudo nano ~/.profile
above the line that says:
python /home/pi/pimame_files/menu.py
we add this to run an EMULATOR:
/home/pi/emulators/mame4all-pi/mame
or we add this line to run a specific ROM:
/home/pi/emulators/mame4all-pi/mame romname
The ROM will have to be located in the proper directory.
*This specific example will start up mame4all and take us to the menu if we exit from mame.
Wi-Fi connection instead of Ethernet
The simplest way to connect our machine will always be through Ethernet, but if for some reason we cannot use one of these connections we can always connect our raspi via Wi-Fi. Piplay comes with a pre-installed Wi-Fi configurator, so we will navigate to it in the menu and enter our Wi-Fi settings. (We will need the keyboard to type at the terminal.)
Editing the arcade GPIO controls
Those who have installed in “advanced mode” will have mapped more buttons than they have. In order to tidy up the configuration and make using the machine easier, it is advisable to delete the buttons that we do not actually have. The gpioneer daemon has a configuration page for this on its web front end.
To access the web front end, we turn on the arcade machine with an Internet connection and type the IP that we will obtain on the home screen of our arcade game in the web browser of our PC/MAC (at the top on the right).
Now we go to the “database admin -> GPioneer” section and delete all the buttons that are not in use.
We can also use this configuration page to change the pins of each button, to make our own mappings and connection tree, to add more buttons or to add multiple keystrokes for system commands. The creator of the script explains all of this a bit better in the following link.